Using UDT Connections
The client is able to connect to other devices via the UDT network protocol which is optimized for high-speed data transfers. It also contains very handy features for the usage of a client running behind an internet router or NAT device. Furthermore, by using the UDP hole punching technique the configuration of port forwarding at the router becomes unnecessary. Many other popular peer-to-peer software (e.g. Skype) also use this technique to simplify the network configuration process.
1. Platforms supporting UDT Connections:
UDT connections are supported on the following operating systems:
- Windows XP with Service Pack 3/Vista/7/8
- Windows Server 2003 / 2003 R2 / 2008 / 2008 R2 / 2012
![]()
Please note: The Microsoft Visual C++ Redistributable Package needs to be installed for UDT connections to work!
Currently, the client doesn’t support UDT on macOS or Linux. That is because the client is still able to connect with full relayed or HTTP-tunneled connections on these platforms and since both methods require the traffic to be relayed by a server, the transfer speed might not reach the maximum of your internet connection. We therefore strongly recommend correctly configuring any firewall and router on these platforms for optimal transfer performance.
2. Using hole-punching aka NAT-traversal UDT Connections:
By default, the client tries to connect via UDT (hole punching mode) in order to make the configuration process as easy as possible if no direct TCP connection can be established. However, before a hole-punching UDT connection can be established, it is required that all devices are connected to a server. The server will act as a relay for the connection initialization handshake before the actual communication happens then directly between the connected devices. The client automatically tries to connect to the server and usually gets at least connected via the HTTP tunnel.
To disable UDT Hole Punching:
- Click on Preferences in the main window.
- Open the tab Network.
- Uncheck the checkbox called Enable UDT transfers and click on OK.
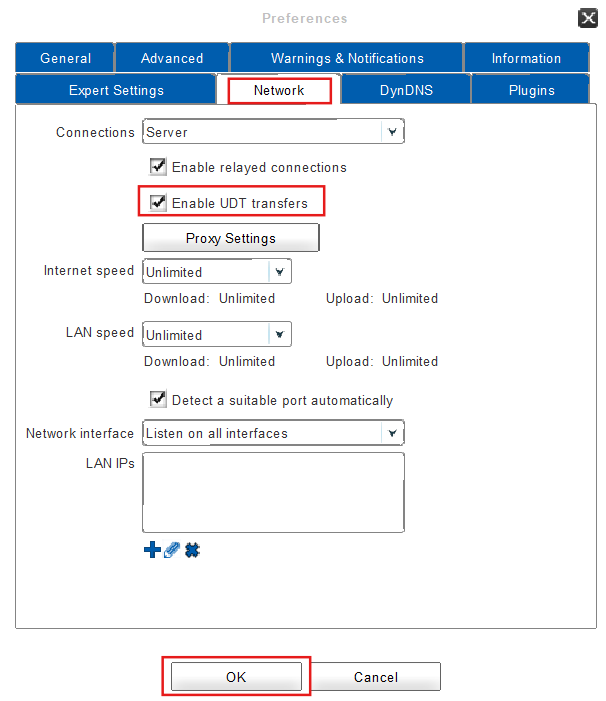
- Done! The UDT hole punching has been successfully disabled.
3. Using direct UDT Connections
It’s possible to directly connect two devices via UDT without them being connected to a server. This option is disabled by default and only recommend when using the client over a high-speed data network. It requires unrestricted communication between the devices without getting blocked by any firewall, router, or NAT device.
To enable direct UDT Connections:
- Click on Preferences in the main window.
- Open the tab Plugins.
- Select UDT connections and click on Enable.
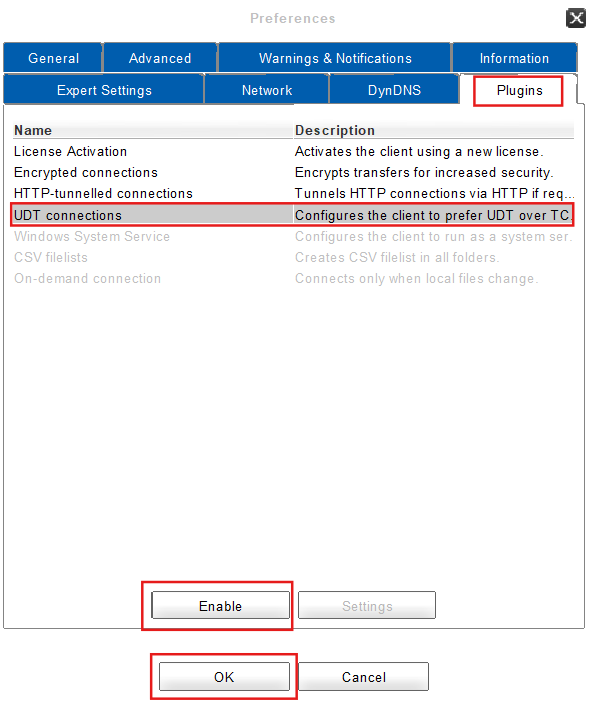
- Next, click on OK.
- Done! Direct UDT connections have been successfully enabled.
This feature controls whether the client should try to connect via UDT directly before trying to connect via TCP. When enabled, the client also listens for incoming UDT connections on the configured data port(s). The default port is 1337.
![]()
Please note: Due to conflicts of UDT on port 1337 (UDP), the client disables the network broadcasting in LAN, which also uses the default port 1337 (UDP).
4. Troubleshooting UDT Connections:
To troubleshoot UDT connections:
- Check whether UDT is available on your platform and whether a Microsoft Visual C++ Redistributable Package is installed.
- Try to manually connect to other devices in the main window -> Devices -> Search Devices -> Connect, entering the IP and port of remote devices.
- Execute “netstat -a -p UDP” on the command line. A line containing “0.0.0.0:1337” should be listed (or a different port and network address, if configured).
- Check the Client Log Files for any problems with UDT components.
- High CPU load: Disable ZIP compression in LAN under Preferences -> Expert Settings and configure all devices to be detected on LAN via the LAN IPs list under Preferences -> Network.